If you've noticed that your Facebook business page isn't getting as much engagement or impressions as you'd like it might be time to consider your first Facebook ad. When it comes to social media for optometry and advertising on Facebook you have a slew of different options, and it's easy to be confused and overwhelmed.
Today, we want to walk you through creating a Facebook ad to promote your practice's business in order to generate new likes for your page. Once you create a larger Facebook following it will make more sense for you to promote individual posts and content to reach all of your new followers.
One of the best things about advertising on Facebook is that you get to customize every promotion. You can choose your audience, where the ad is seen, how long to run an ad, and how much money you'd like to spend. And, compared to more traditional forms of advertising, social media advertising is a relatively cheap method for reaching your customers.
Social Media for Optometry: How to Promote Your Business Page
There are a few different ways you can promote your page and begin creating ads on Facebook. Here, we will walk you through an easy way to promote your practice's business page to generate more likes.
- Create Your Ad Set. Once you are logged in to your business page, from the top right arrow drop down select, Manage Ads. From there, in the top right corner you will see a green Create Ad button. Then you will select Promote Your Page.
- Create a Campaign Name. Use something that is easy to identify. For example, "VisionWeb Page Likes - November."
- Choose Your Audience. Facebook gives you a lot of different criteria to choose from. If it's your first ad and you're looking to grow followers to your Facebook page, we suggest starting with a location-based audience. Down the road when you promote specific Facebook posts you can choose different audience options such as, "Friends of People who Like Your Page." But, in our example we will show you how to create your audience based on your location.
- Select the city or town where your practice is located, and choose a mile radius. It makes no sense in gaining Facebook followers who live in Chicago if your practice is located in Austin, TX.
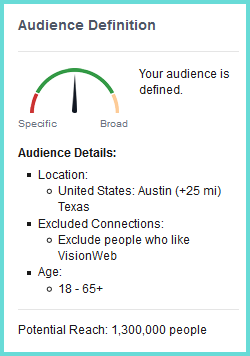
TIP: On the right hand side you'll see information about your Audience Definition. This gives you the details of all the audience criteria you have selected so far, and let's you know if the audience you have created is too broad or narrow. - If you want to experiment with your audience you can choose specific interests and behaviors to make your audience more specific. But again, if this is your first ad we suggest keeping it simple.
- Select the city or town where your practice is located, and choose a mile radius. It makes no sense in gaining Facebook followers who live in Chicago if your practice is located in Austin, TX.
- Pick Your Budget and Schedule. Here you have the freedom to pick a daily budget, or a lifetime budget, and decide how long you want to run the campaign for. This is all up to you. Play around with the numbers here until you are comfortable with the budget, reach, and schedule.
Tip: On the right hand side you will see your estimated daily reach. As you're playing with your budget numbers it will change to show you how many people your ad is likely to reach. - Creating the Ad Content. Facebook has a handful of stock photos to choose from to create an image for your ad, but we suggest using or creating an image that is more personal to your practice and your brand.
- Click Select Images. Facebook automatically uses your cover photo as the default image for your ad. If this image works well for the ad you can leave it, or you can delete it from the campaign by hitting the small x in the top right corner. If you have a good photo of your ODs or your staff all together this could be a good image to use to promote your page. If you'd like to create more images to use, try out Canva. Facebook allows you to use more than one image in an ad set so that you can test images against each other to see which type of image performs better.
- Add Text. You're going to be limited to the amount of characters you can use, but choose an inviting line of text that shows what your followers will gain from joining your community.
- Preview Your Ad. On the right hand side you're going to see an ad preview that includes your header, text, and image. You can select different views to see how your ad will show up on desktop and mobile devices.
TIP: These days your ad is going to be seen more on mobile devices than desktop, so make sure to pay attention to how your ad looks on mobile.
- Place Your Order. You did it! You created your first Facebook promotion. Facebook will alert you when your ad has been approved. Once it is approved you'll start seeing your new followers trickle in! But don't just forget about your ad once it starts. Visit the Manage Ads page to see the details of your ads performance.
TIP: A big reason for ads getting rejected is due to the 20% text rule. If you upload an image that contains text it must take up less than 20% of the image. Facebook is a stickler with this rule, so uploading photos or images with no text can help you avoid this problem.
